
Surfing wetsuit vs diving wetsuit: the key differences are the intended exposure, movement and equipment contact, then the materials, entry system and evidence needed for approval. Surf designs prioritize paddling and board contact. Scuba development must also address pressure exposure and compatibility with diving equipment.
For brands, a useful comparison connects each difference to a written specification. A thicker label alone cannot establish greater warmth, flexibility or suitability for another activity.
For brands and product buyers, this means preparing two use briefs before requesting two quotations. Here, diving wetsuit means a conventional wetsuit for recreational scuba diving. Freediving, triathlon, drysuits and specialist protective suits need their own requirements.
Choosing between a wetsuit and a drysuit is a separate decision. Compare their insulation, fit and training requirements in our wetsuit vs drysuit guide for recreational scuba.

1. Surfing wetsuit vs diving wetsuit: six specification differences
Use the table as a brief-writing checklist. It describes questions to resolve, not a rule that every surf suit is flexible and every scuba suit is stiff. DAN’s overview identifies different shoulder demands and the effect of depth on insulation; the actual response still depends on the garment. [1]
| Review area | Surfing brief | Scuba brief |
|---|---|---|
| Exposure | Water and air conditions, wind, waiting periods and session length | Water conditions, intended depth range, duration and repeated-use pattern |
| Movement | Paddling reach, prone posture, pop-up and knee or hip flexion | Swimming posture, finning, arm reach and access to equipment controls |
| Contact zones | Board contact, knee loading and repeated changing | BCD or harness, waistband or weights, shoulders and other actual gear-contact areas |
| Material system | Finished-panel stretch, lining, recovery and required wear resistance | Those same fields plus evidence relevant to the intended pressure exposure |
| Entry and seals | Donning effort, closure position and control of water exchange | Those same checks with the intended hood, gloves, boots and equipment |
| Approval evidence | Measurements, relevant movement review and agreed assembly checks | Measurements, equipment compatibility and agreed material or thermal evidence |
A brand can share selected materials or components across the two lines. It should not assume that an approval for one use validates the other. If the project is instead about open-water racing, use the separate triathlon versus surfing development guide.
2. Define surf and scuba use conditions
“A premium 5mm wetsuit” leaves the factory to guess too much. Name the activity, target wearer, sizing basis, intended environment and expected use frequency. For an existing range, add the current model and the specific limitation the new garment should address.
For surfing, describe the balance between paddling, sitting, riding and changing. Record the board-contact areas and whether the proposal includes a hood or other accessories. A cold-water surf brief and a warm-weather surf-school brief may justify very different constructions.
For scuba, state the intended depth and duration range, exposure conditions, dive frequency and equipment configuration. These describe the proposed use; they do not constitute an approved operating limit. A retail travel suit and a frequently used rental suit also need different handling and maintenance discussions.
Then identify the evidence needed for any customer-facing claim. If marketing wants a temperature recommendation, extended-use claim or comparative warmth statement, assign the evaluation before approving that wording. Leave an unresolved value open instead of turning a supplier’s informal suggestion into a guarantee.

3. Compare paddling movement and diving equipment contact
For surfing, evaluate the shoulder in the finished suit
A soft material swatch is a useful starting point, but it does not show what happens after the lining, seams and entry panel are assembled. During an agreed fit review, examine the shoulder, underarm, upper back and torso together. Record where reach creates tension, a fold or a moving neckline.
O’Neill’s Hyperfreak description, for example, emphasizes larger panels, fewer seams and underarm seam placement as part of its mobility-oriented design. That is a specific construction example. It is not evidence that removing a seam from any pattern will improve the final garment. [3]
For a supplier comparison, provide the same wearer measurements, sample size and ordinary movement tasks to each team. Keep observations specific: “pulling at the right underarm during forward reach” is more actionable than “needs more stretch.”
For scuba, include the equipment that meets the suit
List the BCD or harness configuration, weight-system contact, accessory interfaces and controls the user must reach. Map these against the shoulder, torso, waist and other relevant panels. Check whether an added patch, zipper or seam creates bulk or contact in those locations.
Waterproof’s W7 illustrates how a scuba model can specify reinforcement by area: its description names shoulder, seat, elbow and knee features. It also includes movement-oriented panel details. The lesson is to identify each location and material; it is not to copy every patch onto a new design. [4]
Both categories need mobility and durability. A brand should choose where reinforcement is useful, then review the finished edge, stiffness and attachment. Avoid interpreting “more reinforcement” as an improvement without checking what it changes for the wearer.

4. Compare surfing and diving wetsuit thickness and materials
A nominal thickness is not a performance result
Write down the foam supplier and grade, outside textile or finish, inside lining, adhesive system and nominal thickness by named panel. Specify the measurement method and tolerance separately. Our wetsuit material selection guide provides the fields for that record.
A “3/2” label does not identify every panel. A “5mm” label does not tell you the complete lining coverage, seam treatment or behavior under pressure. Ask for a panel map and material references before comparing prices.
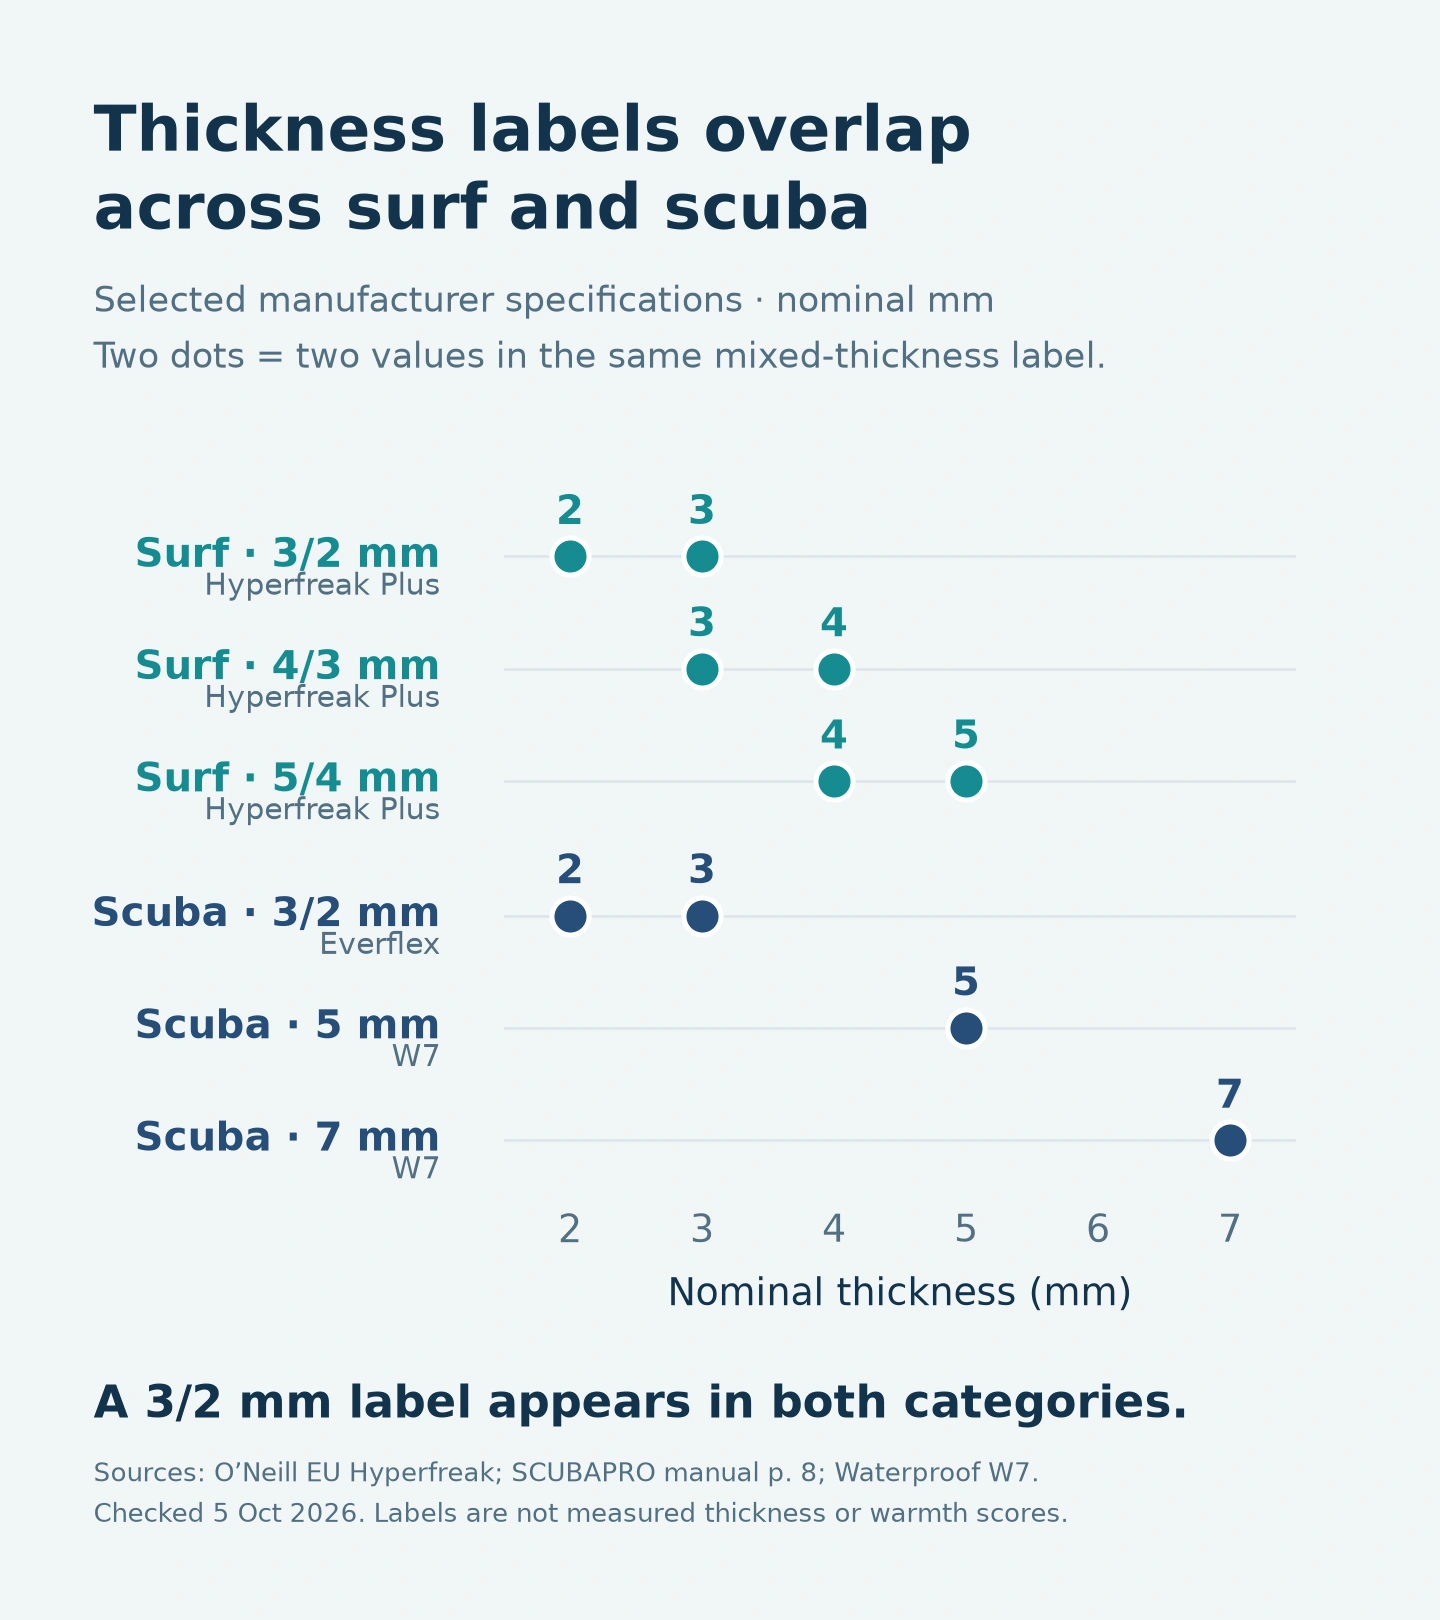
A 3/2mm label appears in both categories. O’Neill’s EU Hyperfreak Plus collection lists 3/2, 4/3 and 5/4mm variants. SCUBAPRO’s manual identifies an Everflex 3/2mm model; Waterproof lists W7 versions at 5 and 7mm. These examples show why “scuba is always thicker” is an unreliable purchasing shortcut. [7] [2] [4]
| Category | Named model / series | Label (mm) | Source |
|---|---|---|---|
| Surf | O’Neill Hyperfreak Plus | 3/2 | [7] |
| Surf | O’Neill Hyperfreak Plus | 4/3 | [7] |
| Surf | O’Neill Hyperfreak Plus | 5/4 | [7] |
| Scuba | SCUBAPRO Everflex | 3/2 | [2] |
| Scuba | Waterproof W7 | 5 | [4] |
| Scuba | Waterproof W7 | 7 | [4] |
These are selected official labels, not measured sample values, market-wide ranges or equivalent warmth ratings. Two values in a label refer to mixed nominal thicknesses; request the manufacturer’s panel map before assigning them to body areas. The plotted O’Neill examples use the EU Hyperfreak Plus naming shown in the source.
Depth introduces a separate evidence question
SCUBAPRO explains that increasing pressure compresses the cells in neoprene, reducing buoyancy and thermal performance. A diving label does not make neoprene immune to that process. [2] DAN World likewise describes buoyancy decreasing on descent and increasing again on ascent as the suit expands. [5]
At 30 metres, the approximate absolute pressure is 4 ATA. PADI’s sea-level seawater teaching relationship is 1 ATA at the surface plus about 1 ATA for each 10 metres of depth. ATA means atmospheres absolute. The chart shows the exposure change a scuba brief must address; it cannot predict a particular suit’s thickness loss or thermal performance. [8]

| Depth (m) | Absolute pressure (ATA) |
|---|---|
| 0 (surface) | ≈ 1 |
| 10 | ≈ 2 |
| 20 | ≈ 3 |
| 30 | ≈ 4 |
Source: PADI [8]. Approximation: P_abs (ATA) ≈ 1 + depth (m) / 10. Values describe ambient pressure, not recommended dive depths. Material response requires separate evidence.
When a supplier proposes a material as more compression-resistant, ask what was compared. A useful record identifies the material and laminate, starting condition, pressure exposure, duration or cycles, recovery interval, measured property and result. Have the supplier and appropriate testing provider agree a method relevant to the project.
Keep thickness retention, recovery, buoyancy and thermal performance distinct. A result for one does not automatically establish all the others. A hand-squeeze demonstration or density value alone is not a substitute for evidence supporting a claimed improvement at depth.
Seams, seals and entry belong in the same review
List the seam construction, tape coverage, collar and cuff design, and complete entry assembly alongside the materials. O’Neill’s entry-system guidance describes trade-offs between opening size, access and flexibility, with internal panels used in some configurations. The zipper category by itself is an incomplete specification. [6]
For each prototype, record the intended arrangement of overlaps and accessories. Check donning, removal and operation as well as appearance. Do not claim that a chest zip, back zip or zipless system guarantees warmth or eliminates water entry.
5. Verify fit, construction and performance evidence
Separate the review into three stages so that a visual approval does not quietly become approval of untested performance.

- Identity and construction. Match the sample to its revision, size, material list, panel map, seam schedule and component references. Record substitutions before assessing them.
- Fit and use. Compare agreed measurements and relevant movement or equipment-contact observations. If live fit is needed, identify the wearer and conditions so the next revision can be compared fairly.
- Performance evidence. Review the agreed material, seam, wear or thermal results. Check that the report applies to the actual material or assembly and supports the specific claim being made.
For surfing, a review might examine paddling reach and board-contact comfort, followed by inspection of the finished seams and reinforcement. For scuba, it might examine the specified equipment interfaces and control access, with specialist evidence addressing relevant exposure requirements. These are proposed review topics, not completed tests.
Any in-water assessment requires a competent organizer, suitable conditions and an agreed safety plan. Do not ask a wearer to make an improvised deep dive to prove a material claim. The review described here does not replace diver training, exposure planning or buoyancy checks.
Our fit testing and sample-approval protocol explains how to connect observations to revisions. INSEAKU does not routinely live-fit every sample; live fit and specialist testing should be agreed for the project.
The approval should identify what was accepted and what remains open. “Appearance approved; equipment compatibility pending” is a useful limited decision. It should not be converted into unrestricted approval for bulk production.
6. Build comparable surf and scuba supplier briefs
The example below shows how the same RFQ structure can produce different development tasks. It is a hypothetical starting proposal, not two actual INSEAKU models, an approved thickness recommendation or a temperature guide.
| Field | Surf proposal S | Scuba proposal D |
|---|---|---|
| Proposed format | Adult full suit for recreational surfing | Adult full suit for recreational scuba |
| Initial thickness map | Explore a 3/2mm configuration; assign each panel before sampling | Explore a 5/4mm configuration; assign each panel before sampling |
| Material selection | Request named foam and laminates for shoulder movement and the stated contact zones | Request named foam and laminates, with available evidence relevant to the stated pressure exposure |
| Contact review | Shoulder and underarm movement, board contact and knee placement | Shoulder and waist equipment contact, knee placement and control access |
| Entry proposal | Chest entry for evaluation; opening, overlap and operation to be documented | Back entry for evaluation; equipment compatibility and closure access to be documented |
| Evidence before approval | Agreed fit observations and material, seam and wear checks | Agreed fit and equipment observations plus the relevant material and exposure evidence |
| Information still needed | Target conditions, wearer measurements, final materials, limits and acceptance criteria | Target conditions and depth profile, wearer measurements, equipment, final materials and acceptance criteria |
The proposed values are there to make the brief discussable. A review may change either thickness map or entry system. Ask suppliers to explain those changes and quote the revised scope, rather than silently substituting a different construction.
Use the editable surf and scuba comparison brief (ZIP) to record both proposals and their evidence gaps. Download and extract the ZIP, then open the HTML form locally. The offline form exports and reloads a JSON file and can be printed. It starts blank so the illustrative values above cannot be mistaken for your approved specification.
Give suppliers the same commercial fields as well: quantity by style, color and size, artwork, packaging, destination, sample stages and requested timing. Ask them to separate garment price, development work and agreed testing costs. Different methods or exclusions can make apparently comparable quotations cover different work.
If the surf project needs an entry, core and performance range, continue with the surf wetsuit specifications guide. This comparison establishes the activity brief; that guide develops tiers within the surf category.
To discuss either project with INSEAKU, send the completed brief, reference images, size chart and any existing reports through our OEM and ODM wetsuit development services. Material availability, construction, validation work, price and timing remain subject to the project specification and written agreement.
Surfing wetsuit vs diving wetsuit: buyer FAQs
Can you use a surfing wetsuit for scuba diving?
Use it for scuba only when the manufacturer’s intended-use guidance and the specific conditions support that use. A brand should claim both uses only with supporting product evaluation. Similar appearance or a shared material does not establish suitability. Define both briefs and resolve any conflicting requirements before approval.
Is a diving wetsuit thicker or warmer than a surfing wetsuit?
Not automatically. The published examples above include 3/2mm labels in both categories. Thickness, lining, fit, seams and exposure all affect the comparison; nominal millimetres alone do not establish warmth. Assess the complete garment and its intended conditions. Treat flexibility as something to review in the relevant movement, rather than something guaranteed by a category name.
Does compression-resistant neoprene stop changing buoyancy?
Do not interpret the phrase that way. Ask for the material-specific evidence and the scope of the claim. Divers still need to account for their complete equipment configuration and follow appropriate buoyancy procedures. [5]
Can a factory approve both lines from a single reference sample?
A reference can establish selected shared details, but it does not automatically approve two uses, all sizes or substituted materials. Identify which design and construction the sample represents, then document the additional work needed for the other line.
References and further reading
Sources checked on 5 October 2026. Brand examples illustrate specific design choices, not a ranking or independent comparison. The two RFQ proposals, review framework and generated images are illustrative; no INSEAKU sample test results are claimed.
- Divers Alert Network — Wetsuits. Background on activity-specific shoulder positioning, fit and insulation. Published in 2012; used for principles, not current product rankings.
- SCUBAPRO — Wetsuits Manual. English pages 7–8: buoyancy and thermal changes at depth; examples of different model thicknesses. Its model-specific guidance is not an INSEAKU rating.
- O’Neill — Hyperfreak Wetsuit Series. A manufacturer example of mobility-oriented panels, seam placement and a chest-entry assembly; not comparative test evidence.
- Waterproof — W7. A scuba model example with named reinforcement areas and articulated panels. Features belong to the described model.
- DAN World — Mistake 4 Lack of Buoyancy Control. Explains how wetsuit compression and expansion contribute to changing buoyancy during a dive.
- O’Neill — Do I need a back zip, chest zip or zipless wetsuit?. Entry-system trade-offs and internal barriers; product-specific guidance rather than a universal ranking.
- O’Neill EU — Hyperfreak collection. Source for selected Hyperfreak Plus 3/2, 4/3 and 5/4mm labels; catalogue specifications, not independent measurements.
- PADI — Diving Physics. Source for the sea-level seawater approximation: 0, 10, 20 and 30 metres correspond to about 1, 2, 3 and 4 ATA absolute pressure.