
Some water inside a wetsuit is normal. Repeated wetsuit flushing with cold surges, persistent pooling or water repeatedly felt at one small area deserve a closer look. Start by checking how the whole suit is seated, then inspect the neck, wrists, ankles, zipper and inner barrier. A wet lining alone does not identify a failed seam.
If the slider is jammed or the chain reopens after closing, use the wetsuit zipper stuck or splitting guide to record that separate mechanical symptom.
If extra space developed in a previously familiar suit, compare new-suit fit and changes in an older wetsuit before treating the fit change as evidence of a leak.
Wetsuit flushing is the exchange of water inside the suit with fresh water from outside. This guide helps wearers, dive-center staff and brand support teams describe that exchange and decide what to inspect next. It concerns conventional wetsuits, rather than drysuit leak testing.
If you are comparing exposure-suit types rather than troubleshooting water exchange, our wetsuit vs drysuit guide explains the differences in insulation, fit and training.
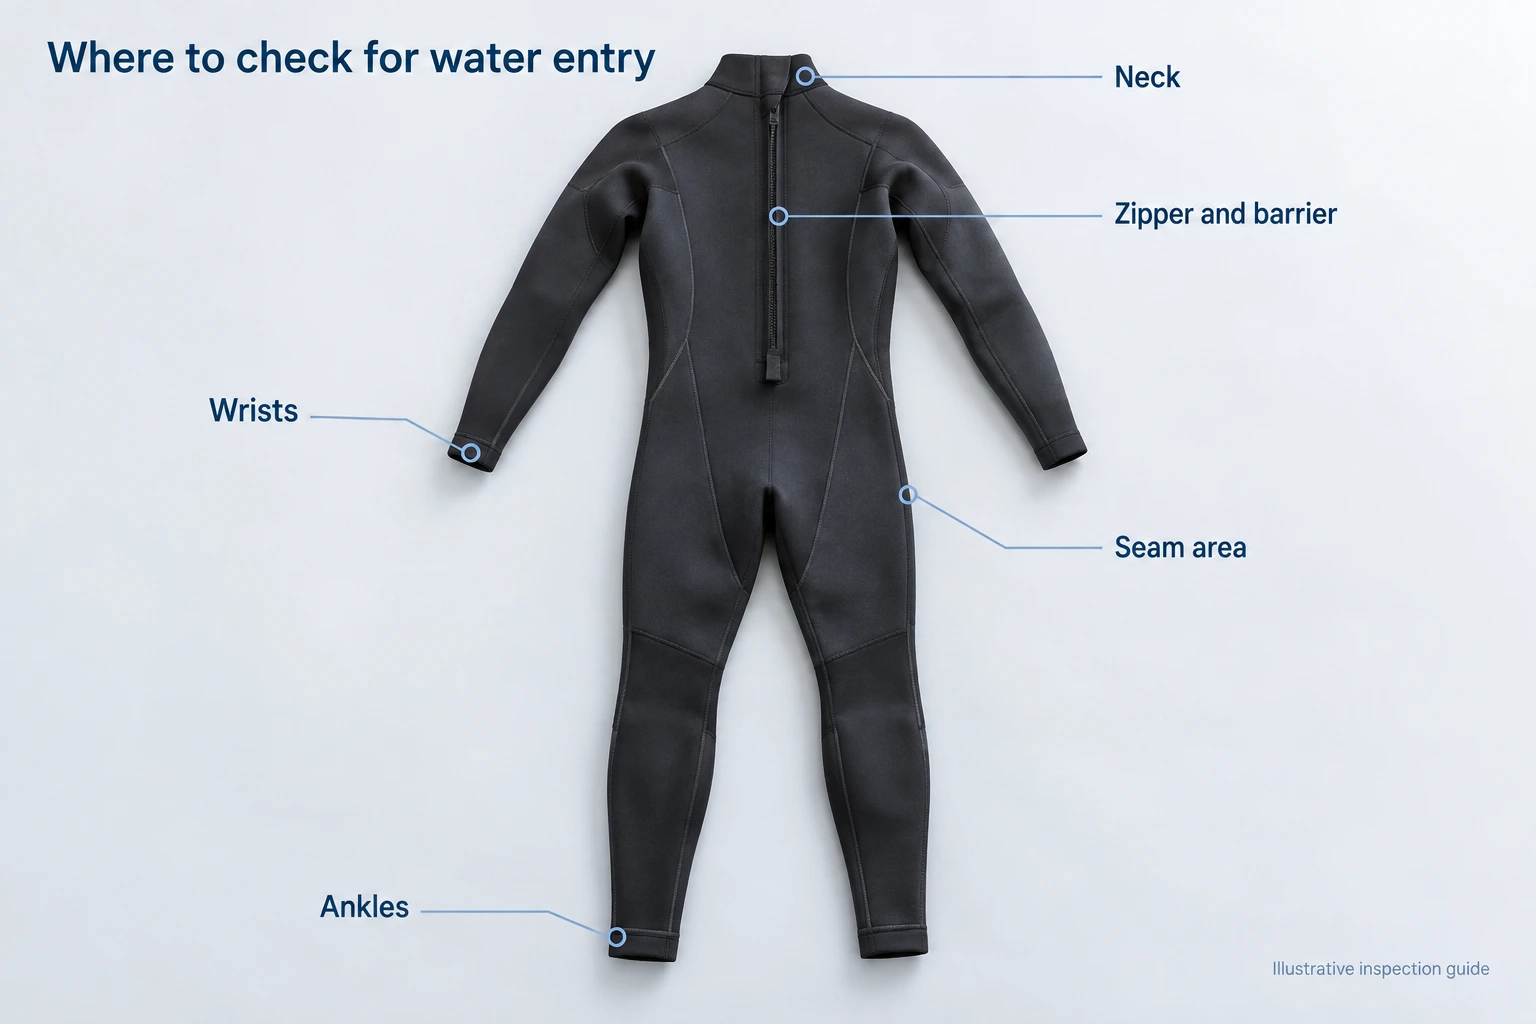
Normal wetting, wetsuit flushing or a possible leak?
A wetsuit reduces heat loss; it does not create heat. The neoprene provides insulation, and a close fit helps limit water circulation. Water next to the skin takes heat from your body. Replacing it repeatedly with colder water increases the heat your body must supply. JMJ’s explanation of wetsuit function distinguishes the insulating material from the water retained inside. [1]
That is why “I got wet” and “cold water kept running down my back” are different reports. Blueseventy also separates the initial entry of water from continuing inflow and pooling in its swimming-wetsuit guidance. [2]
| What you notice | What to check next | What it does not prove |
|---|---|---|
| Interior becomes wet on entering the water | Whether a distinct cold inflow continues after entry | That the suit has a hole |
| A cold surge returns with a particular movement | Openings and closure position during that movement | That the zipper or nearest seam has failed |
| Water collects or moves around a loose area | Whole-suit seating, fit and the possible route into that area | That the collection point is the entry point |
| The same small area repeatedly feels cold or shows damage | Inside and outside of that location; report it for assessment | The cause, repair method or warranty outcome |
This is a reporting framework, not a pass/fail test. There is no useful universal allowance such as “one flush per minute” for every wetsuit, activity and wearer. If thermal comfort is deteriorating, end the session safely rather than trying to meet an informal allowance.
Check whole-suit fit before correcting wetsuit flushing
Carry out the first inspection on land. Use the donning instructions for the exact model, and settle the legs, crotch, torso and sleeves before judging the neckline. Do not try to correct material left low on the body by pulling hard on the collar.
Orca’s fit guidance connects chest and neck fit with comfortable breathing and shoulder movement; it also identifies torso tension from an overly tight crotch area. A smaller label size is therefore not an automatic solution to water entry. [3]
Make a short comparison record:
- Before reseating: where is the suit bunched, pulled or visibly standing away from the body?
- After reseating: did that specific area change, and is the closure in its instructed position?
- During comfortable movement: does a gap appear, a panel shift or breathing feel restricted?
Use ordinary movements appropriate to the activity, within your comfortable range. A dry inspection can reveal a problem to investigate; it cannot certify performance in water. Record the model and size as well as the observation, so a retailer or brand can compare the actual garment with its own sizing guidance.
Use location and movement as clues
Neck entry during a turn or reach
If you describe your wetsuit as “leaking at the neck,” note whether the cold surge occurred during ordinary head rotation, a forward reach, wave impact or another identifiable event. Check for a folded edge, trapped hair or clothing, an incorrectly positioned overlap, or a gap that appears only with movement.
Blueseventy’s neck guidance starts with positioning the torso correctly before adjusting the neckline. It also warns against a collar that pinches. Use that principle with your model’s instructions; do not turn a suggested adjustment for one swim suit into a rule for every collar shape. [4]
Do not solve flushing by fastening the neck until it hurts. If the same area also rubs, use our wetsuit neck chafing guide to record the contact point and collar details separately.
Wrists and ankles during arm or leg movement
Inspect both sides and note any difference. Is an edge rolled? Is fabric caught under it? Does a cuff move away from the skin when the limb changes position? If boots, gloves or a hood are involved, record how their edges meet the suit and check the instructions for that combination.
Use “left wrist during an arm reach” rather than simply “water in sleeve.” Do not assume every cuff should be rolled, cut shorter, moved higher or covered by a tight strap. Any adjustment should preserve the construction and follow the manufacturer’s directions.
Location is a clue, not a verdict. Water first felt at the waist may have entered higher up. Write down the first sensation and where water later collected as two separate observations.
Inspect the zipper and the inner barrier separately
A closed zipper is only one part of an entry assembly. Some wetsuits also have a panel behind the zipper that helps manage water entry. O’Neill describes this arrangement in its back-zip guidance; other systems have different overlaps, attachments and opening shapes. [5]
With the suit off, check the parts you can inspect without forcing or dismantling them:
- Closure position: check the intended closed position in the product instructions. Do not assume all sliders close in the same direction.
- Obstructions: look for caught lining, grit or another visible obstruction. Stop if the slider needs force.
- Barrier position: where fitted, check whether the inner panel is arranged as instructed or has folded away from its intended overlap.
- Visible condition: photograph separated teeth, a damaged stop, loose stitching or a torn attachment rather than repeatedly operating it.
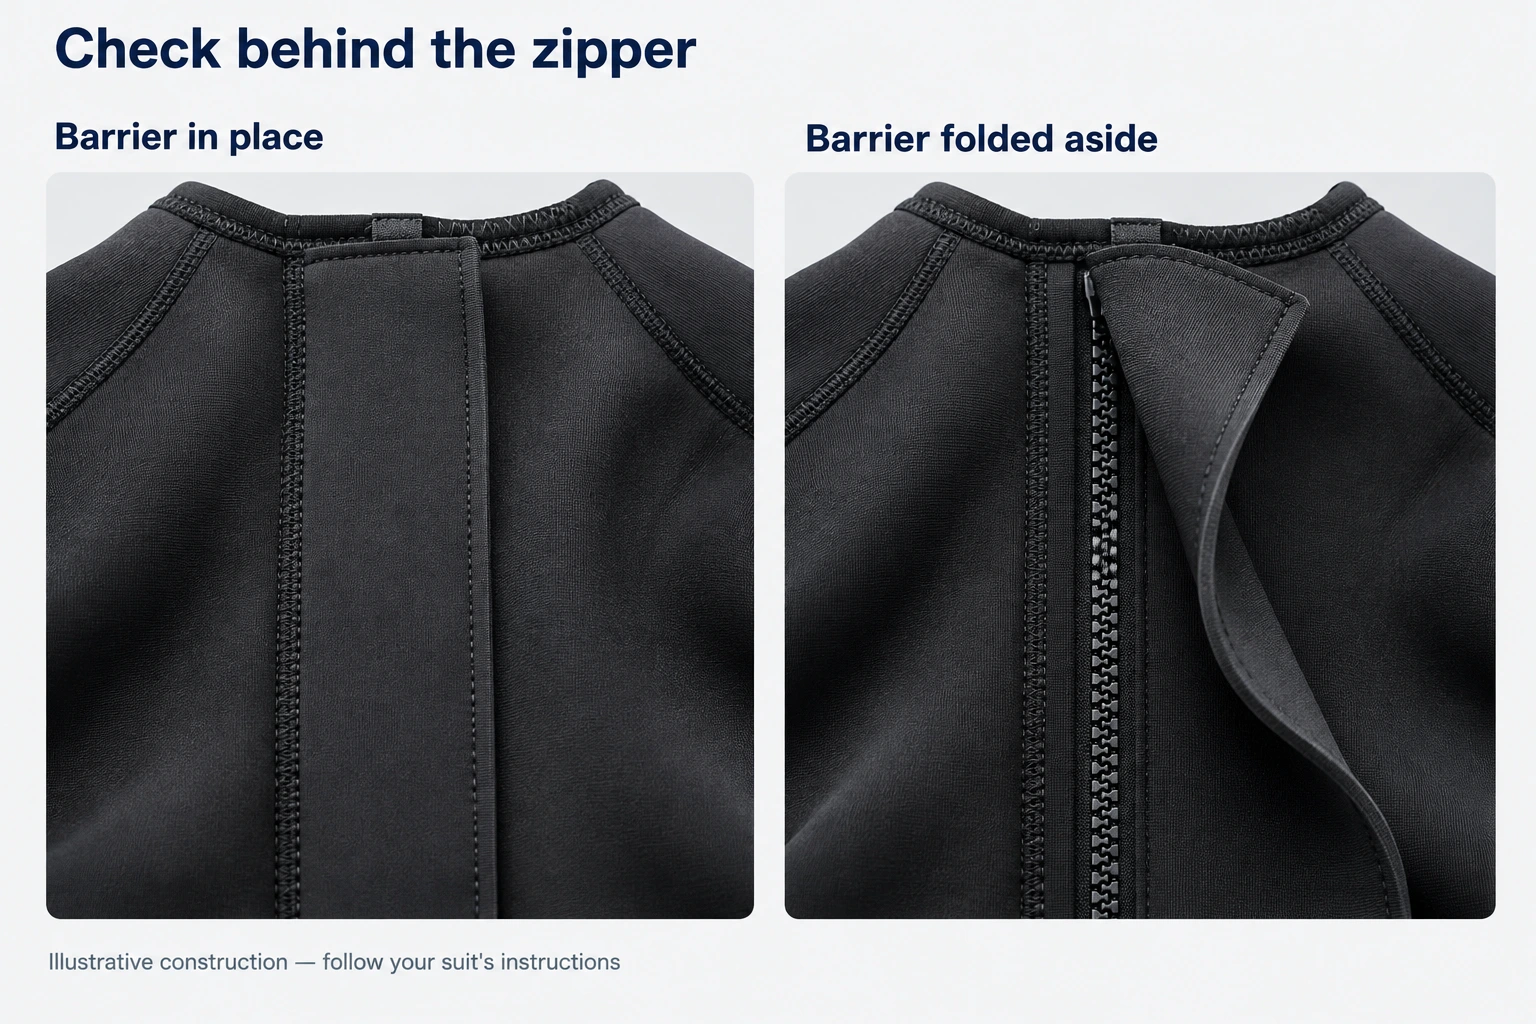
Do not seal an unfamiliar hole before identifying it. Some entry designs include drainage features: O’Neill’s ZEN ZIP description, for example, identifies a barrier with a drain hole. A designed drain and a tear need different responses. [6]
For product development, our chest zip, back zip and zipless specification guide explains how the full assembly is specified. Switching entry categories alone does not guarantee that a wearer’s flushing problem will disappear.
Look for a repeatable local problem without assuming the cause
When the report repeatedly points to one small area, inspect that location inside and outside under good light. Photograph an apparent cut, open join, damaged zipper attachment or lifted tape before manipulating it. Include a wider image that shows where the detail sits on the garment.
Keep the observation distinct from its explanation. “Tape edge lifted beside the left underarm” is evidence someone can review. “The factory used the wrong glue” is a conclusion the photograph alone cannot establish. A visible defect can also coexist with water entering through an opening.
The specified seam matters. Flatlock stitching passes through the material; glued and blind-stitched construction and additional tape use different approaches to managing seam water entry. These are not interchangeable expectations, as O’Neill’s seam guide illustrates. [6] Our GBS, flatlock and taped seam comparison explains the development choices.
Send the record to the seller or manufacturer before trimming, peeling or applying glue. A technician may need the unaltered area to assess it. Do not fill the suit as a hanging water bag or inflate it to improvise a pressure test; a home setup has no agreed loading conditions or acceptance criteria.
When to stop and how to report wetsuit flushing
If you become uncomfortably cold, lose dexterity, feel restricted in breathing or cannot operate your equipment normally, stop troubleshooting and end the activity safely with your buddy or supervisor. On a scuba dive, follow your training and safe ascent procedures. Do not repeat the problem in deeper water, surf or strong current to obtain better evidence.
Shivering and confusion are among the signs discussed in DAN’s cold-exposure guidance. Seek prompt assistance for concerning symptoms; confusion or reduced responsiveness requires emergency help. Do not wait for severe symptoms before ending a cold session. [7]
Once safe, use the downloadable water-entry record (ZIP) to capture the following. Download and extract the ZIP, then open the HTML record locally. It works offline, can export and reload a JSON record, and can be printed.
| Record | Include |
|---|---|
| Garment identity | Brand, model, size, purchase or sample reference, and batch label if available |
| Use and conditions | Activity, session duration, water temperature if measured, underlayers and accessories |
| First observation | First location, time after entry and movement or event |
| Pattern | Initial wetting, repeated surge, pooling or a suspected local area; note uncertainty |
| Visible evidence | Whole-suit fit photos where appropriate, a location view and close-up; obtain the wearer’s permission |
| Changes and next step | What was reseated, any earlier repair or damage, and the brand’s response |
Care for the garment according to its label while awaiting instructions. O’Neill’s care advice, for example, calls for fresh-water rinsing and drying away from direct sun. It does not establish which cleaning products or repair materials suit a different brand’s garment. [8]
For brands and dive centers, separate the report from the decision
A customer should not have to identify a seam process to report a problem. Ask for the location, timing and circumstances first, then have the product team compare the garment with the relevant specification and approved sample.
Illustrative report, not a customer case: “A cold surge was felt near the upper back during an ordinary arm reach. The wearer later noticed water at the waist. No tear was visible during the initial inspection.” This supports checking the upper entry assembly and fit. It does not prove that the waist panel leaked or that a size change will fix it.
For a rental fleet or batch complaint, record each garment separately before grouping the reports. Ask whether they concern the same model, size, construction version or identifiable damage. Avoid converting one unclear report into a diagnosis for an entire batch.
If the next step requires a controlled sample assessment, use our wetsuit fit testing and sample-approval protocol. Define the area, method, conditions and acceptance criteria before testing. Keep the wearing report attached so the technical team understands the problem it is trying to resolve.
Developing a range or reviewing a recurring fit complaint? Send INSEAKU the intended activity, size chart, entry and seam details, sample version and observation record. Our OEM and ODM wetsuit services provide a starting point for discussing the project. Any revised construction and performance requirement needs its own sample review and written agreement.
Questions about wetsuit flushing
Is a wetsuit supposed to let water in?
Its interior can become wet during normal use. That does not mean a continuing cold flow or accumulating water should be ignored. Describe the pattern, check the garment’s intended use and inspect the relevant areas.
Should I buy a smaller wetsuit to stop flushing?
Only after reviewing the actual fit. A different size or pattern may help, but the current suit may also be incorrectly seated or damaged. A replacement must still allow comfortable breathing and movement. Compare it with the manufacturer’s model-specific size guidance.
Does a cold patch mean the seam beside it is leaking?
No. The first place you notice cold water may differ from the entry point. Record whether the same location and movement recur, inspect the area and have any suspected defect assessed.
Will a chest zip or zipless wetsuit stop all water entry?
No entry-system name is a guarantee. Review fit, overlaps, condition and intended activity together. A design intended to reduce flushing can still admit water if it does not fit or is incorrectly arranged.
Can I glue a suspected leak straight away?
First identify what you are looking at and check the brand’s repair instructions. Photograph it before changing it. An intended drain, a folded barrier and a torn seam are different problems, and an adhesive is not a universal solution.
References and further reading
Sources checked on 5 October 2026. Manufacturer guidance applies to the products it describes; it is not an INSEAKU performance guarantee. The inspection sequence, diagrams and reporting form are editorial tools, not a standardized leak test.
- JMJ Wetsuits — How Wetsuits Work. Neoprene insulation and reduced circulation of water next to the body.
- Blueseventy — Why does my swimming wetsuit fill with water while I swim?. Initial water entry versus persistent filling; swimming-wetsuit inspection context.
- Orca — How should your wetsuit fit you?. Whole-suit fit, neck and chest comfort, shoulder movement and torso length.
- Blueseventy — How do I properly seal the neck of my wetsuit to avoid water entry?. Seating the suit before reviewing the collar; movement and water-entry observations.
- O’Neill — Do I need a back zip, chest zip or zipless wetsuit?. Examples of entry systems and the internal panel behind a back zipper.
- O’Neill — Wetsuit Guide. Flatlock, glued and blind-stitched, and taped seams; an example of a barrier with a designed drain.
- Divers Alert Network — Avoid the Chill. Cold-exposure planning and warning signs, including shivering and confusion.
- O’Neill — Can I wash my wetsuit in a washing machine?. Fresh-water rinsing, drying away from direct sun and following the garment instructions.